April 26, 2010

Caps Off to the Graduates!!

It's that time of year when many of us our sending our little children (not so little anymore) off to the next chapter in their lives. Lucky for me I have one more year before I send my first off to college. However, my brothers and several other teens I know are graduating this year. As we all may have experienced, what do we get for the kid who's leaving home?

My favorite is always resorting to a gift card or a card with cash. How teenagers love cash! If you know what college they are off too a gift card to the college bookstore is best. Then the next step is finding the perfect card.

Well, my June Scrapbooks, etc magazine just arrived and I found my inspiration. In the magazine there is a section with graduation card ideas etc. But, that is not where my inspiration came from it came from the introduction page to the ideas. On this page is a cute graduation cap which appears to be made from paper. I immediately thought to myself wouldn't that be cute if I turned that cap into a gift card holder. So I did and I want to share how I made it with you so you too can make one.


You will need the following items:

1 - 12X12 piece of light weight chipboard
1 - 12X12 piece of patterned paper (school colors)
1 - scrap piece of complimentary paper.
1 - skein of embroidery floss
1 - Bottle of Modge Podge glue
1 - Sponge Brush
1 - Bone Folder
1 - Beacons 3 - 1 glue
1 - Button
1 - Velcro Circle

Instructions:

Cut the chipboard in 2 pieces; 1 - 5X10 piece and 1 - 12X1 1/2
piece. Set the remainder aside for another project. Score the 5X10 piece at the 5" point to make a perfect 5X5 square. Cut your paper into 2 - 5x10 1/4 pieces of paper and 1 - 2X 12 piece. It will be a little longer than the chipboard, this is to allow slack for the bend (you can cut any excess later). Lightly cover the 1st square with Modge podge, press your paper and smooth with the bone folder. Repeat until all 4 sections are covered. You will then take the 12" piece of chipboard and wrap with the remaining 12" piece of paper. This will only cover one side and be enough to fold over the other side by 1/2". Staple the 12" piece of chipboard into the shape of a circle and then adhere your circle to the bottom of the 5X5 card with the beacons glue, hold long enough for it to set.

Make a tassel from the embroidery floss and adhere to the top of the hat with a button. When adhering the button make certain the tassel is hanging over the creased edge of your hat. It gets in the way when opening the card if its hanging from any of the other sides. I liked the rounded button better then the one with holes in it however, you can use whichever one you like. Place the Velcro dot on the inside of the card at the edge of the flap to hold the card closed. On the left flap I adhered a pocket made from scrap paper and with a chalk writer pen I inscribed "Class of 2010" then placed my gift card in the pocket. On the right flap I adhered a Graduation Poem I found from the Internet and printed it on white paper (distressed the edges). Finally the project is complete and it took approximately 45 minutes from start to finish to have the best custom made gift card holder for this years grads.

Have fun making yours for your favorite graduate and don't forget to sign your card.
February 23, 2010

Ranger Mat Meets St. Patricks Day

Recently I purchased a Ranger craft mat and was having trouble traveling with it and not bending it up. I asked my friend, "catinthegrass" how she totes hers around in her scrap bag and she said she uses an empty toilet paper roll to keep it from unrolling during transport. What a genius idea!!! Why didn't I think of that?

I began using the toilet paper roll and realized it was reminding me of the one thing we all dread. Walking into the bathroom to find the roll was left empty only for me to change it out for a new roll while doing the potty dance. So, I needed to make my roll a little more appealing and less of a horrible reminder. I decided I would alter it but, I can not stop at just one roll. I will need one for every holiday. At least that is the plan for now. Who knows I may get sick of making them after the third or fourth one.

So the alterations to the toilet paper roll begin. With my new S.E.I paper pack "Pistache" just arriving in the mail I have found my inspiration. Good timing S.E.I! This paper pack is great because it covers many holidays plus it has other amazing coordinating sheets. Why not kill two birds with one stone, part of this upcoming Scrap Agains challenge from the embellishment table is to use green flowers, buttons ribbons and brads. I am well on my way to finishing one of this months design team projects.

Below are the pictures that show the before and after of my Ranger Mats first new friend aside from me, the one who abuses it!

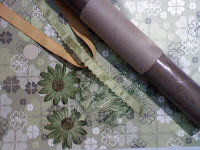
I used the following products to complete this project. One toilet paper roll, a 6 X12 piece of S.E.I (Pistache) paper, yellow ribbon to hide the paper seam, two green flowers and buttons, green embroidery floss and a chipboard tag. I then added the word "Lucky" to the tag with a Sharpie pen.

January 31, 2010

Little Girls and Their Sleepovers

Recently my friend Catinthegrass told me about a page contest using a Becky Fleck Page Map for a page map blog contest. I was so excited about the contest and couldn't wait to design my masterpiece for the contest.

Of course like any layout the biggest decision to be made is what pictures will I use. I went back and forth and then stumbled across a handful of old pictures from 1995 of my daughter and her friend Kiana having a sleepover at our house. Girls are some much fun when they are this age because they love to pose for the camera and don't have a care in the world what they look like. Below is the sketch and my interpretation of the layout:

The Sketch:


My Layout:


I used: Basic Grey paper (Infuse Saturate) and Doilies, Stickles (Frosted Lace), We R Memory Keepers (Love), Quick Quotes Poem, My Minds Eye (Signature Life), Patterned paper from a Costco pack, Chipboard, and buttons.

The layout was fun to do and I am happy to have some more old pictures out of the photo box.

January 28, 2010

January's Design Team Challenges (Scrap Again)

This was the first official month for my design team projects to be submitted and ready for the all day crop on January 9th. I am looking forward to next months crop since I am also teaching the lunch and learn. You can find the upcoming crop schedule at http://www.scrapagain.com/.

Challenge #1 was to alter a composition notebook. Now that I am on a design team, I wanted mine to be a place where I could store pictures and details of all my layouts and projects I have completed this year. I will also keep data on all the page contests I enter for the year in my book. To date I have about six entries in my book and it will grow alot since I forsee a busy year.

Challenge #2 was to use a product called Kaiser droplets. Kaiser droplets were the January giveaway at the all day crop for bringing a friend. My layout is of my son playing soccer this season. Soccer is his all time favorite sport. The Kaiser Droplets are on the bottom left corner and are used as bullets for each phrase. I actually liked the sheer effect the droplets have so I was able to put one over the top of of a photo and you can still see the detail thru the droplet.

Challenge #3 use items from the emelishment box. The embelishment box this month contained 3 themes.
  • Metal items
  • Blue, white embelishments and snowflake items to represent winter
  • Red and green embelishments for Christmas.

These embelishments are displayed as complimentary items to use at the crops and change each month. My layouts are below:

"Freezin for a Reason" I used snowflakes, ribbon and brads from the box. These pictures are from from the snow in Susanville, CA when my daughter was 3. The pictures are of us and my friend Carrie's family having a little winter fun."Christmas" - I used metal key chain links, flat jewely charms and a flat jack as my star on top the tree. This layout is a photo of my son and our 4 legged children Athena and Luna Christmas morning 2009.

January 23, 2010

Overcoming Fear of Electronics

For a couple years now I have been wanting to introduce my sewing machine to my scrapbook pages. However two things were holding me back, the only machine in the house is my daughters quilting machine and I was afraid I would make a disaster of a great layout. Don't worry it's not a high end machine but she uses it when my mom, my aunt and her get together to make charity quilts.

So time continues to go by and I see all these great layouts my friends have made or I find on other blogs sites that have sewing as an embelishment. And like my dog who drewls over things she wants I too find myself drooling (Ha Ha) for some pages in my book to have a little machine stitching on them.

Awhile back I purchased on of those "Sew Crafty Mini Machines" and thought I would give that a go first. About 4 weeks ago I pulled the machine out and and attempted to sew on some scrap paper. Well lets just say the machine does not do what I wanted however, it is a great paper piercer. Guess that little machine is finding a new home, in my next donation box.

Finally, last week while my daughter was away I snuck in her closet and pulled out her machine. Set it all up and then I went to town on scrap paper first. Of course I went from a moment of anxiety to oh my this is so much fun!!!! I pulled out a page I scrapped about 5 months ago that I felt needed stitching and I began to introduce the scarry machine to my scrapbook pages. It's not perfect but it is a learning process in progress and I'm so glad I finally did it. In time I will get better as I get used to the machine and the speed. In the mean time I remind myself there is never a mistake in the world of art only an opportunity.

Check out my stitched layout. Another little fear overcome, yeah!!!

January 11, 2010

A Big Dream, A Little Nudge and Here I Am...

Many of us from time to time wonder: do I have time, am I good enough, will others like my creative side. Well with a little nudge from a friend about 4 months ago my fears started to dwindle away.

With the encouragement of a good friend, my friend and I submitted for our first design team. This is when the dream started to become a reality for me. With sadness in my heart she was not chosen to be by my side on this first adventure. I believe there are other little monsters behind this story as to why she would not be. Then again maybe there is something bigger out there for her and she is about to find it.

So with a little nudging from one friend to another here I am. My friend has and continues to inspire my creative side. I could only hope I am inspiring her to realize she is an amazing artist that has alot to share with others like me. Although I don't think I will need to nudge her along, she will be the one with the gentle tap saying to me, "what are you dragging your feet for" or something along those lines. Thanks friend for the gentle push...